

Most people think hedge trimming techniques come down to which tool you’re holding. They don’t. The technique, the exact motion, angle, and guide used for each cut, is what determines whether a hedge ends up with a crisp, professional line or an uneven mess that needs correcting all over again. This guide to hedge trimming techniques for beginners breaks down the five real methods used to cut a hedge properly, and how they work together in a single job.
What to Know: Hedge Trimming Techniques
Hedge trimming techniques are the specific cutting methods used to shape and maintain a hedge’s surface; sides, top, edges, and overall form. They’re not alternatives you pick one of; a normal trim uses several of them together, on different parts of the same hedge. Knowing each one properly is what separates a clean result from a rough one.
Why Technique Matters More Than Tools
It’s easy to assume good hedge trimming comes down to owning the right gear, but the sharpest blade in the world won’t fix a cut made at the wrong angle or in the wrong motion. A hedge trimmed with the correct techniques looks deliberate; one trimmed without them looks hacked at, regardless of how expensive the trimmer was. The motion is the actual skill, the tool is secondary.
The 5 Hedge Trimming Techniques
These are the best pruning techniques for hedges when it comes to shaping the surface: side cutting, top cutting, batter cutting, chamfer cutting, and template cutting. A single trimming job typically combines several of these, sides and top on nearly every hedge, batter or chamfer depending on the shape you want, and template cutting only when a rounded or topiary form is involved.
1. Side Cutting
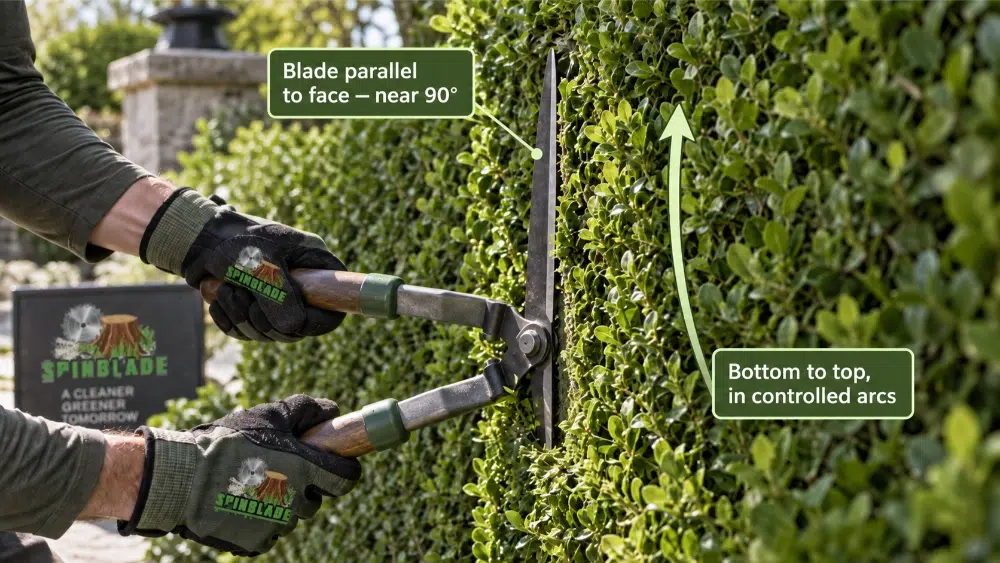
Side cutting is the technique that shapes the vertical faces of a hedge into a flat, even plane, with the blade held essentially parallel to the face, close to a true 90-degree angle from the ground. It’s the foundation of nearly every trim, since the sides make up most of a hedge’s visible surface. Without a properly side-cut face, none of the other techniques; batter, chamfer, or template, have a clean vertical base to build on.
Best For:
- The sides of any hedge, on virtually every trimming job
- Establishing or maintaining a straight, even vertical line
Avoid: Working top to bottom instead of bottom to top, cuttings fall onto the lower, uncut section and make it harder to see your line as you go.
How to Do It:
- Start at the base of the hedge
- Keep the blade parallel to the face of the hedge
- Work upward in a controlled arc motion, using both sides of the blade
- Move steadily along the length of the hedge rather than cutting one section too deep before moving on
2. Top Cutting
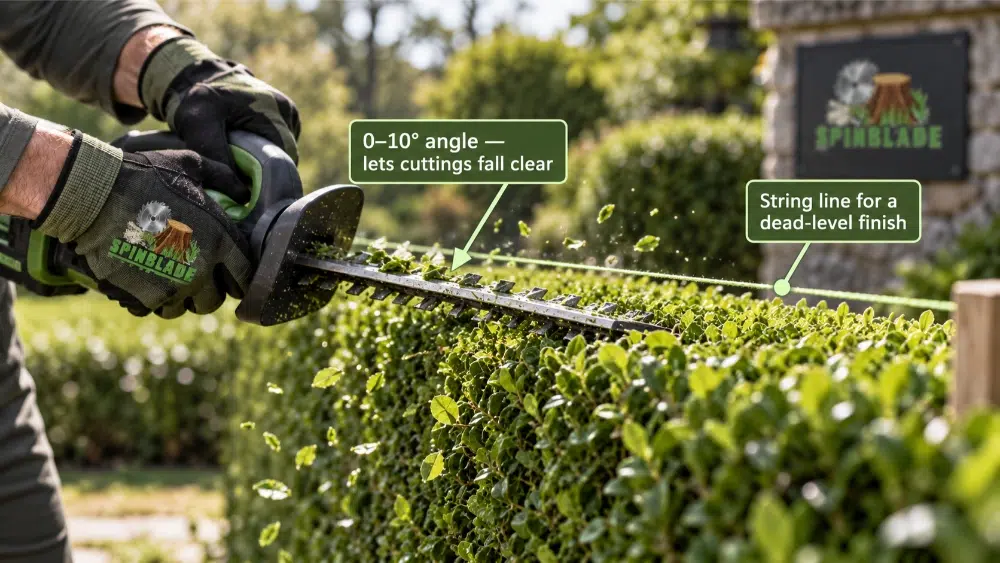
Top cutting is the technique that levels the crown of a hedge into a single, uniform horizontal plane, with the blade held at a shallow 0 to 10-degree angle rather than perfectly flat. It’s mechanically distinct from side cutting because the crown faces upward rather than outward, which is exactly what that slight angle accounts for, it lets loose cuttings fall clear instead of collecting on the surface. A hedge can have flawless sides and still look unfinished without a properly cut top.
Best For:
- Leveling the top of any hedge once the sides are done
- Hedges at or below chest height, where the top is easily reached without a ladder
Avoid: Holding the blade completely flat with no angle at all — it traps cuttings on the surface instead of clearing them, and makes it harder to judge the line as you cut.
How to Do It:
- Hold the blade nearly horizontal, angled about 0 to 10 degrees
- Sweep in a wide, crescent-shaped motion across the width of the hedge, this is how to trim a hedge for even growth across the whole top, not just the middle
- Let the angle carry loose cuttings off the top rather than leaving them sitting on the surface
- Use a taut string line as a height guide, which is the most reliable way of how to trim hedges evenly instead of by eye
3. Batter Cutting
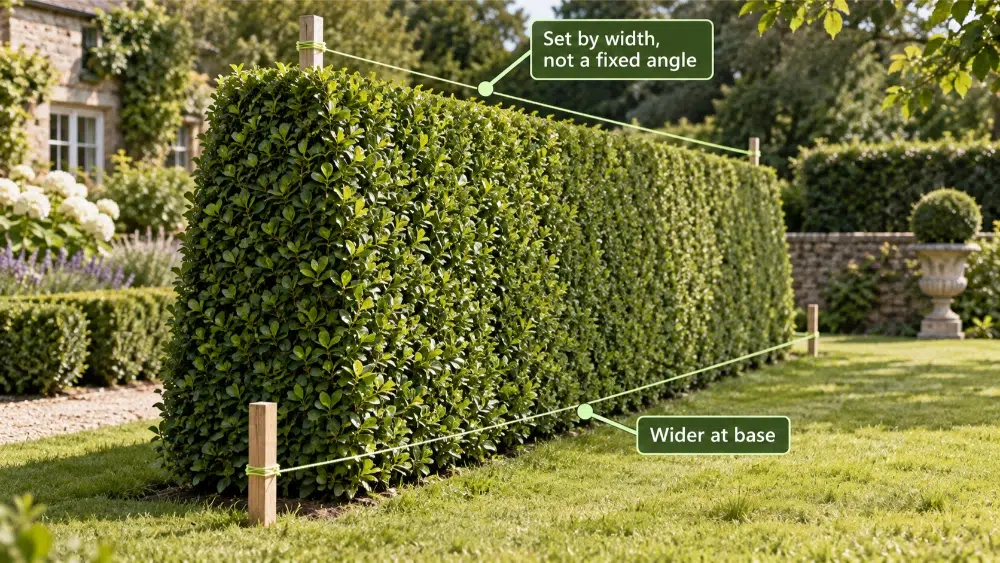
Batter cutting is the technique that shapes a hedge’s sides into a taper, wider at the base than at the top, rather than leaving them perfectly vertical. Unlike top cutting’s fixed 0 to 10-degree range, batter has no single standard angle; it’s set by the width difference between base and top, which is why it’s typically marked out with stakes and string rather than cut to one fixed measurement. It’s applied on top of side cutting rather than replacing it, and it exists specifically to solve a light problem: a perfectly vertical hedge gradually shades out its own base.
Best For:
- Tall or wide formal hedges, where the top would otherwise shade the base
- Any hedge prone to thinning or bald patches near the bottom
Avoid: Skipping the taper on a tall hedge entirely, a hedge cut with dead-vertical sides eventually shades out its own lower growth, no matter how well the top and sides are otherwise maintained.
How to Do It:
- Set up angled guide strings at both ends of the hedge, marking the wider base and narrower top
- Cut the sides following that angled line rather than straight up and down
- Keep the taper subtle, a slight lean is enough to let light reach the lower branches
4. Chamfer Cutting
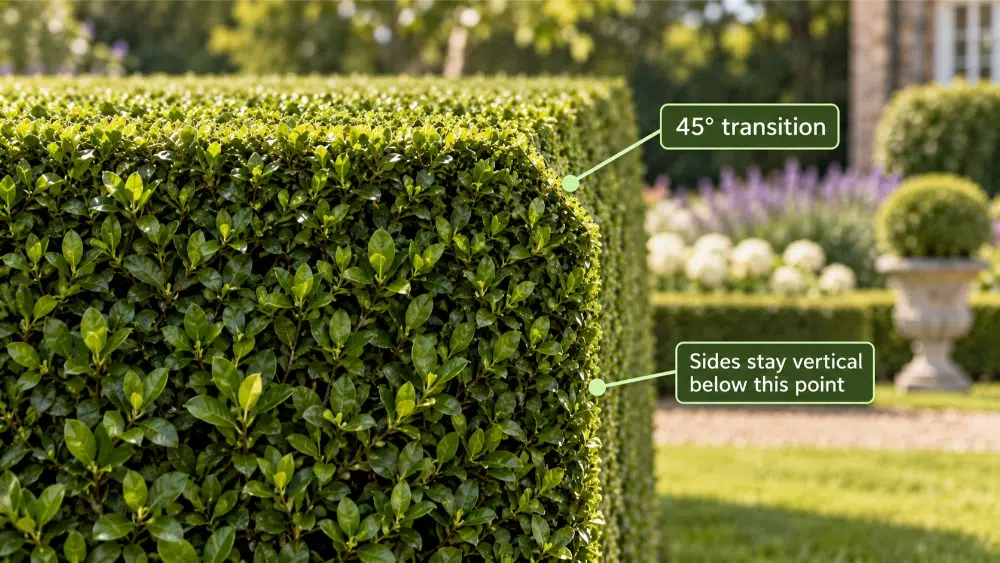
Chamfer cutting is the technique that adds a single angled transition, a consistent 45 degrees, where a vertical side meets the flat top of the hedge, rather than tapering the whole side the way batter does. That specific angle is what makes it a chamfer rather than a rounded or softened corner; a shallower angle starts to blend into a curve, and a steeper one barely reads as a transition at all. It’s a finishing technique, not a structural one, it doesn’t solve the light problem batter addresses, it only softens the corner where two flat planes meet.
Best For:
- Formal hedges where a fully vertical face is wanted, but a hard 90-degree corner at the top looks too severe
- A softer transition between the side and top without a full taper down the entire height
Avoid: Confusing this with a full batter, a chamfer only affects the top corner, not the whole side, and cutting too far down the face turns it into an unintended taper instead.
How to Do It:
- Cut the sides fully vertical, as usual
- Identify the section near the top where the side will meet the flat top
- Angle the blade to about 45 degrees and cut that upper section back to meet the horizontal top cleanly
5. Template/Curved Cutting
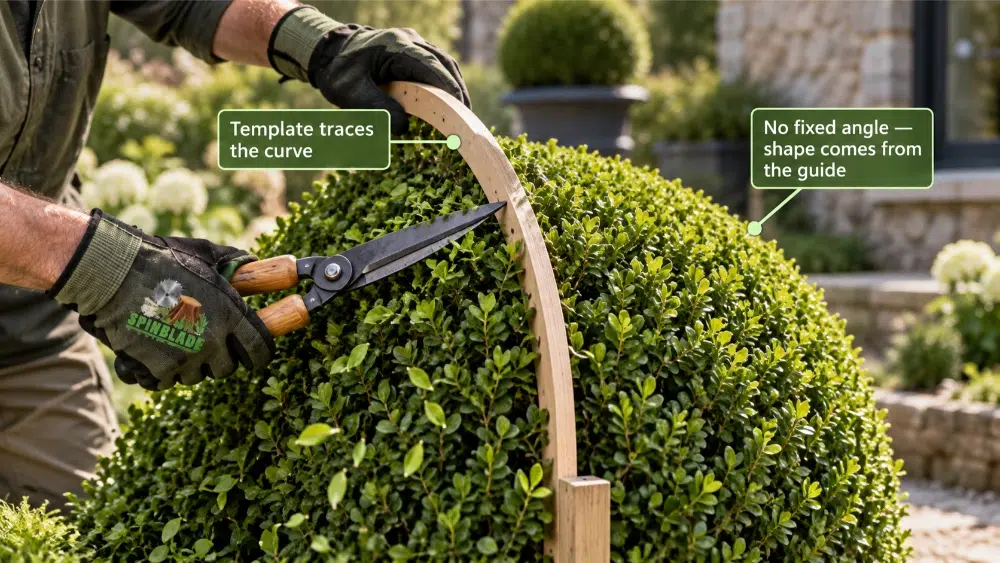
Template cutting is the technique that produces a rounded, domed, or topiary shape using a physical guide, a frame, twine, or a cut template, rather than a fixed angle at all.
Where side, top, batter, and chamfer cutting are each defined by a specific angle or measurement, template cutting has none, a continuous curve can’t be held to one blade angle the way a 45-degree chamfer or a 0-to-10-degree top can. This makes it mechanically the odd one out of the five: the only technique built around a non-flat result.
Best For:
- Rounded or domed hedge tops instead of a flat line
- Topiary shapes and detailed ornamental forms on dense, slow-growing species
Avoid: Trying to freehand a rounded or topiary shape without any guide, small inconsistencies are nearly invisible cut by cut, but they compound into a visibly uneven curve once you step back.
How to Do It:
- Build or position a template against the plant, matching the desired curve or shape
- Trim in short, controlled passes directly against the template’s edge
- Step back frequently to check the curve stays consistent along the full length of the hedge
Get Precise Trimming with Professional Results
Not every hedge can be fixed with DIY cuts. Our arborists use the correct hedge trimming techniques for your specific hedge type to deliver clean lines and lasting health.
Getting a Clean, Even Result
A couple of supporting habits make every technique above easier to execute well. Stretching a string line along the side or top before cutting is the fastest way to keep a straight, level result instead of relying on your eye, and on a significant reduction, taking it in multiple light passes rather than one deep cut makes it far easier to correct a slightly-off pass than to fix over-cutting.
Quick Tips to Avoid Hedge Trimming Mistakes
A few habits prevent most of the common hedge trimming mistakes that damage an otherwise well-cut hedge.
- Avoid trimming too early in spring, wait until after the last frost to protect tender new growth
- Skip trimming during droughts or peak heat, since a stressed plant heals more slowly
- Don’t force a hard batter or chamfer onto a naturally-shaped informal hedge, match the technique to the hedge style
- Step back frequently while cutting to check your line before you’ve gone too far on one side
- Always work with clean, sharp blades, a dull blade tears instead of cuts and makes every technique harder to execute cleanly
Getting the technique right from the start also cuts down on long-term hedge trimming costs, since a hedge cut unevenly usually needs corrective work later.
Why Trust an ISA-Certified Arborist for This
Getting five techniques to actually work together on a real hedge, knowing when a batter is needed versus a chamfer, or when a template is worth the extra time, is exactly the judgment that separates a professional result from a DIY attempt. SpinBlade’s hedge trimming work is led by Cole Horton, a Certified Utility Arborist (CUA) who trained through a 4-year apprenticeship with the Ontario College of Trades, following ISA-certified standards on every job.
That certification isn’t just a credential, it’s the difference between a hedge that’s cut and a hedge that’s shaped correctly for its species, its height, and its long-term health. For hedges taller than chest height, formal shapes that need to stay sharp year after year, or a hedge that’s already gone uneven, professional technique matters more than any tool you could buy.
Frequently Asked Questions
In Short
Mastering hedge trimming techniques isn’t about picking one favourite method, it’s knowing how side cutting, top cutting, batter, chamfer, and template cutting each play a role in the same job. Used together and applied correctly, they’re what separates a hedge that looks deliberately shaped from one that just looks cut. Know the technique, and the result takes care of itself.
Get Precise Trimming with Professional Results
Not every hedge can be fixed with DIY cuts. Our arborists use the correct hedge trimming techniques for your specific hedge type to deliver clean lines and lasting health.