

I’ve been raising crowns on Ottawa trees since 2017, and the calls I get most often start the same way: a low branch is scraping a roofline, blocking a sidewalk, or shading out a garden that used to get full sun. If low-hanging branches are blocking views, scraping vehicles, or casting too much shade, crown raising is usually the fix. In this guide, I’ll walk you through when and why we use this pruning technique, the tools and steps involved, and how to keep the tree healthy once the cut is made.
Quick Steps on how to Do Crown Raising
- Gather your tools and PPE: bypass shears, loppers, a pruning saw, and a pole pruner for reach. Helmet, eye protection, gloves, and sturdy footwear before any cut.
- Scan the site: check for power lines overhead, dead or hanging limbs, and clear the drop zone before you start.
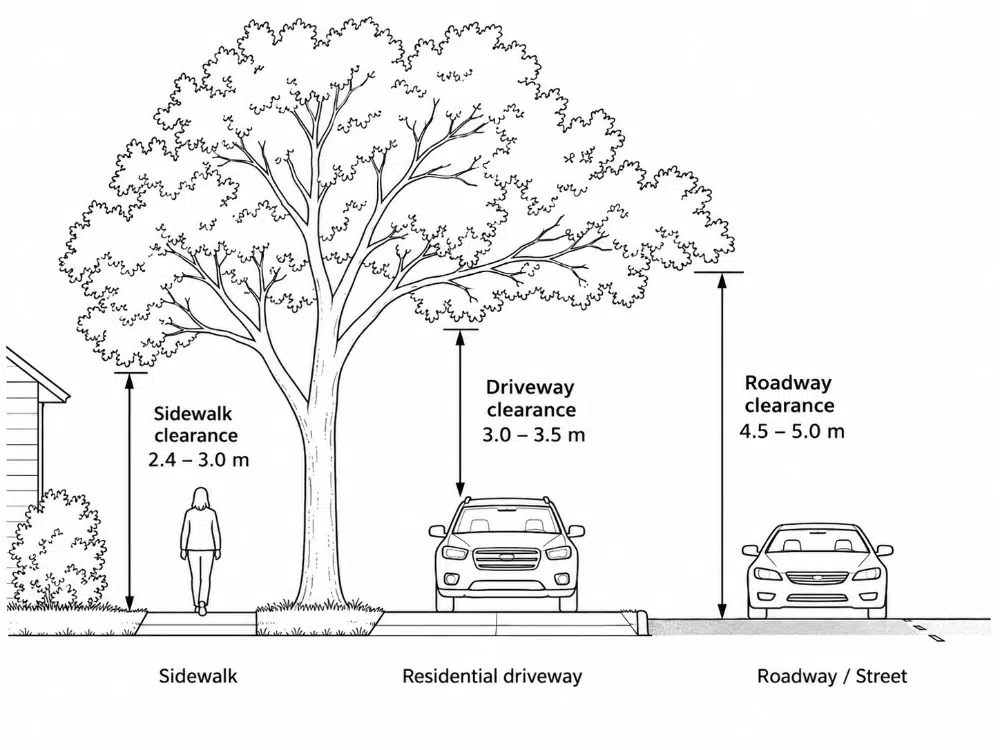
- Mark your clearance target: 2.4–3.0 m for sidewalks, 3.0–3.5 m for driveways, 4.5–5.0 m for roadways. Chalk or tape the line so you don’t creep past it.
- Check the live crown ratio: keep at least 60% of the canopy intact, and don’t remove more than 25% of live foliage in one season.
- Remove branches in this order: dead/diseased/damaged first, then clearance conflicts, then crossing branches, tight V-crotches, and suckers last.
- Cut with the three-cut method on heavy limbs: undercut, top cut, then a final cut just outside the branch collar. Never cut flush.
- Step back and check symmetry every few cuts, don’t strip the inner foliage and leave bare tips.
- Water and mulch after: a deep soak within a day or two, then a 5–7 cm mulch layer kept clear of the trunk.
- Call a certified arborist if: the branch needs climbing or rigging, or it’s thicker than 10–15 cm.
What Is Crown Raising?
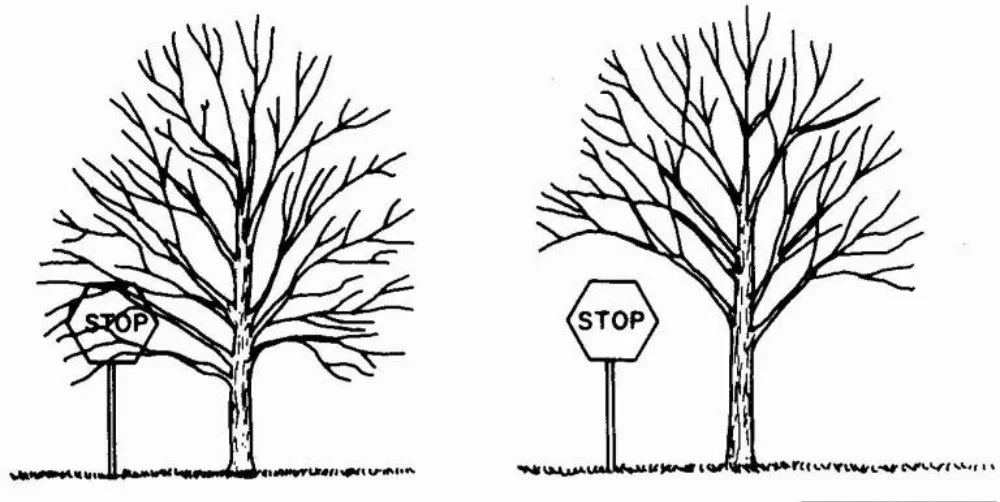
I explain it to clients as removing a tree’s lower branches to open up clean space beneath the canopy. Some arborists call it crown lifting or canopy raising, same technique, different name. It’s done for both practical and aesthetic reasons: improving clearance for pedestrians and vehicles, opening up sightlines, and letting more sunlight reach the ground. Done correctly, raising the crown can improve the tree’s structure, encourage healthier growth, and clean up the overall look of a property.
It’s easy to confuse raising the crown with a couple of other pruning methods we get asked about constantly ,crown reduction and crown lifting itself. I’ve broken those differences down below, since picking the wrong one is the most common mistake I see homeowners make before calling a pro.
Crown Raising vs. Crown Lifting vs. Crown Reduction
Clients ask me almost every week which of these three they actually need. Here’s how I tell them apart on a job site:
| Technique | What It Actually Does | When I Recommend It |
|---|---|---|
| Crown raising / crown lifting | Removes lower branches to lift the bottom of the canopy | Clearance problems — driveways, sidewalks, sightlines, low limbs over a roof |
| Crown reduction | Shortens the overall height or spread of the tree by cutting back outer branches | Height or spread is the issue — often near power lines or when a tree has outgrown its space |
| Crown thinning | Removes select branches throughout the canopy to let light and air through, without changing overall size or shape | Airflow, sun penetration, or reducing wind resistance without changing the tree’s silhouette |
“Crown raising” and “crown lifting” are genuinely the same technique, I use both terms with clients depending on which one they’ve already heard. Crown reduction is a different job entirely: if your real concern is a tree that’s grown too tall or wide (especially near power lines), crown reduction is the better fit, not a raise. Crown thinning is closer to what some clients mean by “trimming” check our full breakdown of tree pruning techniques if you’re not sure which category your job falls into.
Some pruning methods, like espalier pruning, are a different category altogether, training a tree along a flat structure rather than removing lower branches. Raising the crown preserves the tree’s natural spread; it just lifts the bottom of it.
Benefits of Crown Raising
The benefit I see most often on job sites is simple clearance, but a proper crown raise does more than that when it’s done right.
When to Use Crown Raising
Crown raising isn’t right for every tree or every situation — I turn it down more often than people expect when the real problem is something else (usually calling for a reduction or a full removal instead). But there are clear cases where it’s exactly the right call:
- Clearance is needed for people or vehicles: For example, over sidewalks, driveways, bike paths, or roadways.
- Light access is limited: Lower limbs can block sunlight from reaching grass, gardens, or windows.
- Height regulations apply: Many municipalities have clearance requirements for trees along public roads or pathways.
If your goal is to reduce a tree’s height for safety near power lines, crown reduction may be more suitable than raising the crown
The Best Time of Year to this pruning method
I always tell clients dormant-season timing isn’t just tradition, there’s a real reason behind it. Late winter to early spring is ideal because the tree hasn’t yet diverted its stored energy into leaf-out; that energy is available for wound response instead, so cuts made now heal faster than cuts made mid-growing-season.
There’s also less sap flow at this stage, which minimizes the risk of attracting pests to fresh wounds. That said, small corrective cuts to remove damaged or hazardous lower branches can still be done in summer, as long as you avoid extreme heat or drought periods.
Tree Types Best Suited for Crown Raising
Some species adapt better to crown lifting than others, including many hardwoods like oak, maple, and ash. Evergreen species may require more caution to maintain an attractive, balanced appearance.
| Tree Type | Examples | Suitability for Canopy raising | Notes & Considerations |
|---|---|---|---|
| Hardwood (Deciduous) | Oak, Maple, Ash | Highly suitable | Maintain strong structure even when lower branches are removed; respond well to shaping. |
| Evergreen (Coniferous) | Spruce, Pine | Use with caution | Removing too many lower limbs can create a bare, unbalanced look and may reduce winter hardiness. |
Ready to give your trees a cleaner, healthier lift?
Book your service today and enjoy a safer, more open landscape, without compromising your trees’ health.
How to Perform Crown Raising
Crown raising follows a logical process to keep the tree healthy and the work safe. Starting with the right tools and safety gear sets the foundation for a successful job. I’ll flag where this is a job to do yourself and where I’d tell you to stop and call a certified arborist instead.
Step 1: Gather the Right Tools and Safety Gear
Starting with the correct setup makes crown raising safer, faster, and more precise.
Hand Tools you will need
Each tool plays a role in crown raising, depending on branch size and reach.
Cleanliness & Tool Care
Sharp, clean tools equal faster, safer crown raising.
Safety Gear That Isn’t Optional
Protect yourself before any cutting begins.
Site Prep & Hazard Scan
A 60-second scan prevents most accidents during tree cutting.
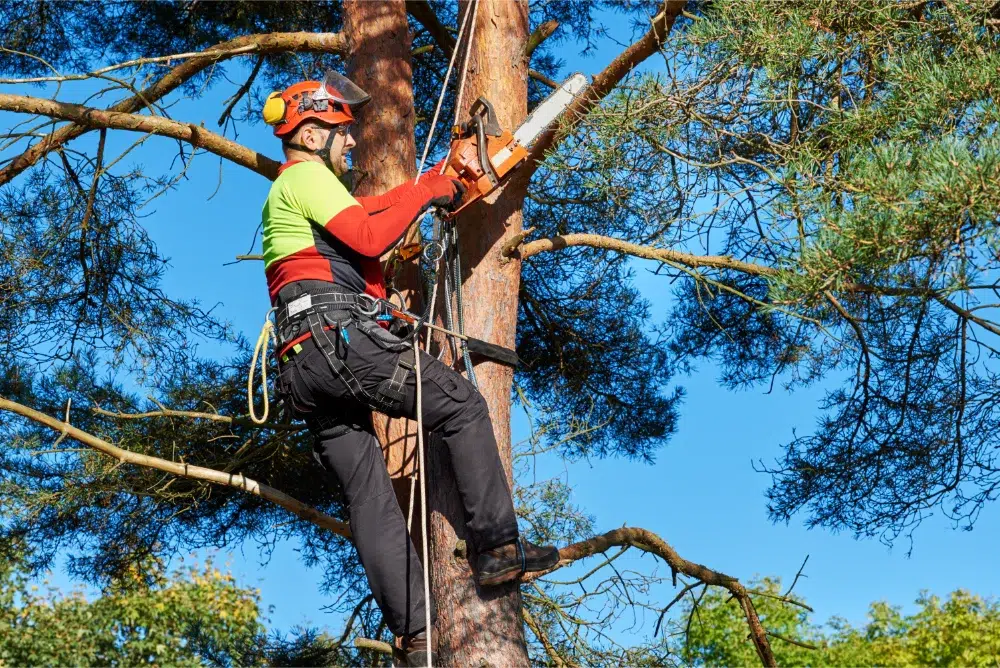
Rule of thumb: If a branch needs climbing, rigging, or is thicker than ~10–15 cm (4–6 in), hire a certified arborist. This is the line I draw with clients every time — DIY crown raising should stay ground-based, and once you’re reaching for a ladder or a limb this size, the risk of a bad cut (or a bad fall) goes up fast.
Step 2: Plan the Desired Clearance
Planning prevents over-pruning and keeps crown raising focused on the right height and amount.
Clearance Targets (Check Local Bylaws)
Use these common targets, then confirm your municipality’s rules.
Keep the Live Crown Ratio Healthy
A balanced plan keeps the crown lifting from weakening the tree.
Step 3: Select the Branches to Remove
Choosing wisely is where crown raising shifts from “just trimming” to intentional structural pruning, this is the judgment call I make on every job, and it’s the part that’s hardest to get right without experience.
Branches to Remove First (in this order)
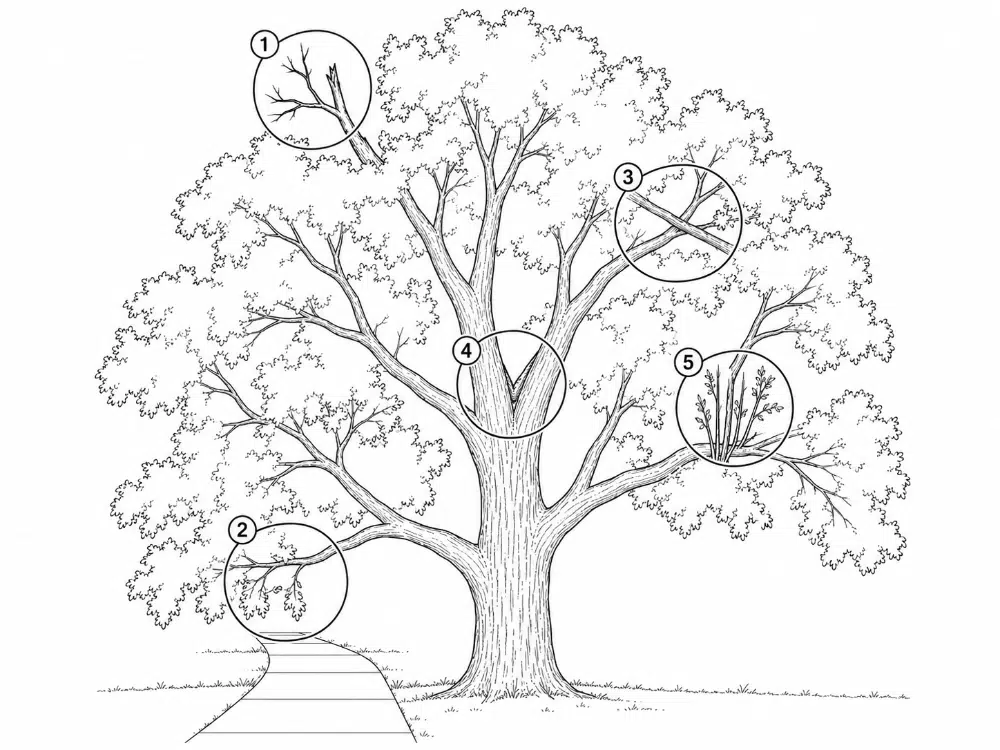
- Dead, diseased, damaged: They fail unpredictably; remove them before anything else.
- Low limbs causing conflicts: Walkways, driveways, doors, sightlines, these are priorities.
- Crossing/rubbing branches: They wound bark and invite decay over time.
- Tight V-crotches: Weak attachments split under load; crown lifting reduces that risk at the base.
- Water sprouts/suckers: Low, fast-growing shoots that steal energy from the main crown.
What to Keep (Structure Matters)
Preserving structure is the difference between a good crown lifting and a butchered tree.
Pro tip: Step back every few cuts. Crown raising is sculptural, evaluate symmetry from multiple angles before proceeding.
Step 4: Make Proper Cuts
Clean cuts help trees compartmentalize wounds; sloppy cuts tear bark and invite decay. Here’s the part most guides skip: why the cut placement actually matters. Trees don’t heal the way skin does, they seal off damaged wood through a process called CODIT (Compartmentalization of Damage In Trees).
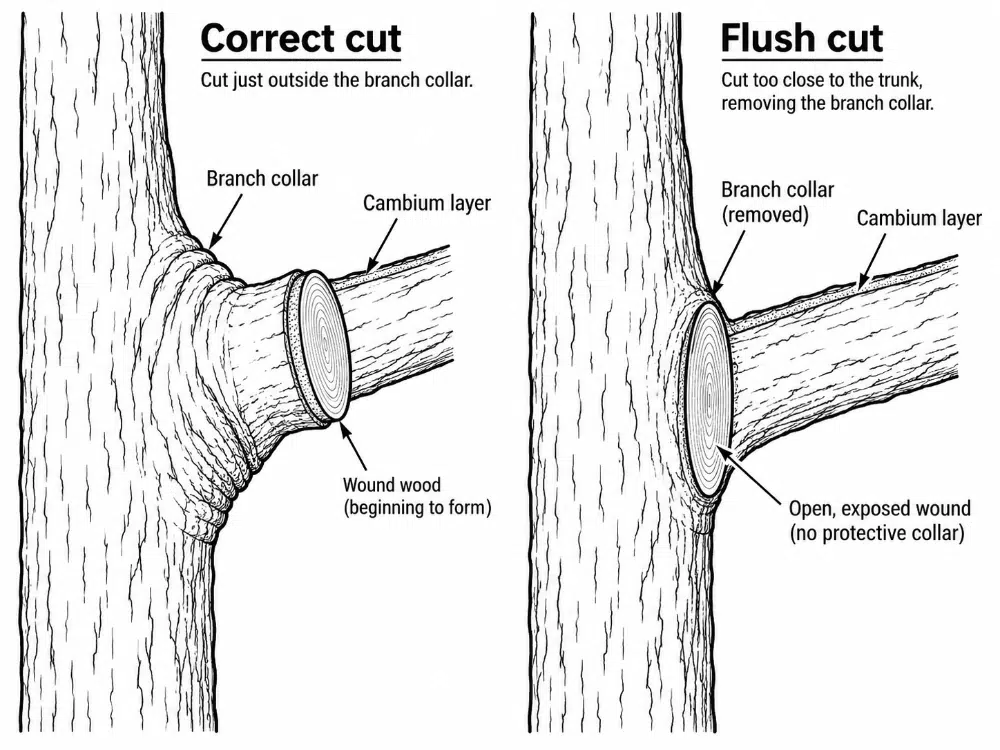
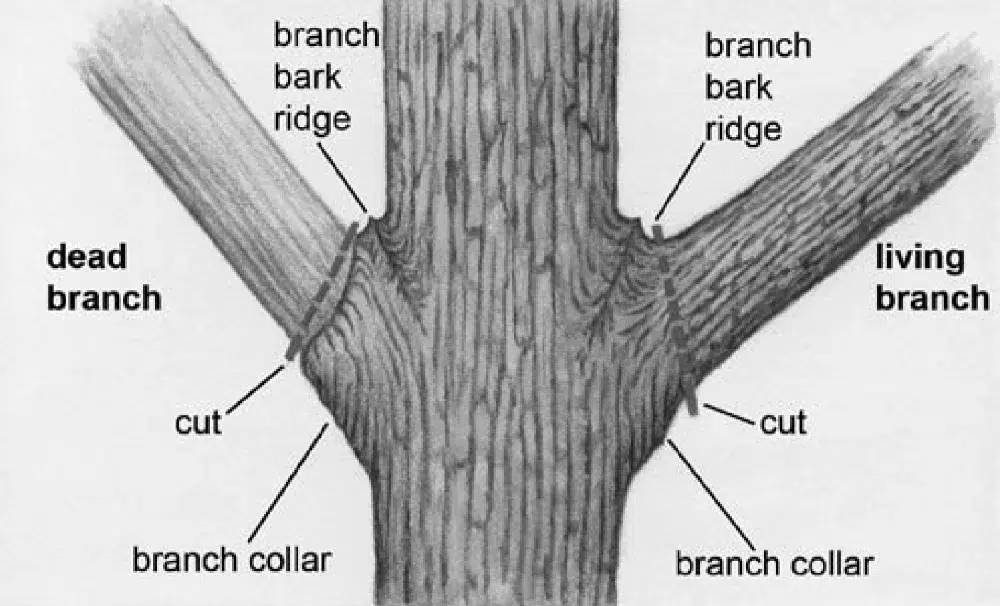
The branch collar is where that sealing tissue lives, fed by the cambium layer just under the bark. Cut flush against the trunk and you remove that collar along with the branch, the tree can’t wall off the wound properly, and it’s left exposed to decay fungi and pests for far longer than it should be. Cut correctly, just outside the collar, and the tree forms wound wood (callus tissue) that seals the site from the outside in.
The Three-Cut Method (for heavy limbs)
This is the safest way to remove weight during crown raising.
- Undercut: 15–30 cm (6–12 in) from the trunk, cut upward ~⅓ through. Prevents bark tearing.
- Top cut: A few centimeters outside the undercut; the limb drops safely.
- Final cut at the branch collar: Remove the stub just outside the slightly raised collar—don’t cut flush.
Small-Diameter Cuts (shears/loppers)
Minor cuts still matter :
Step 5: Maintain Balance and Proportion
Finishing well ensures clearance without ruining form.
Shape, Don’t Strip
Avoid the common pitfalls that weaken trees after crown lifting.
Stage Large Changes Over Time
Gradual crown raising protects health and aesthetics.
Ready to give your trees a cleaner, healthier lift?
Book your service today and enjoy a safer, more open landscape, without compromising your trees’ health.
Aftercare and Long-Term Maintenance
Finishing the cuts isn’t the end of the process. Proper aftercare helps the tree recover quickly and maintain its improved clearance for years.
Watering After crown raise
Fresh cuts increase a tree’s water needs, especially in dry weather. Give newly pruned trees a deep soak within a day or two after crown raising, especially if the soil is dry, and keep that up through the first few dry spells that follow. Mature trees usually need about 25–40 liters (6–10 gallons) of water per week during those stretches. Water slowly at the drip line (the edge of the canopy) rather than right at the trunk, so it reaches deep roots instead of just wetting the surface.
Mulching for Root Protection
Mulch shields roots from temperature swings and helps retain soil moisture.
Pest and Disease Monitoring
Fresh pruning wounds can attract insects and fungi if not monitored, this is where that damp-air/fungal-germination issue we mentioned earlier becomes a real risk if you skip inspection. Check cuts monthly for signs of dieback, cracking, or oozing sap, and keep an eye out for pests like borers, scale insects, or carpenter ants, especially on trees that are already stressed.
Treat issues early; small infestations are far easier to manage than full outbreaks.
Scheduling Follow-Up Pruning
A good maintenance plan prevents overgrowth from undoing your efforts.
Frequently Asked Questions
In Short,
Crown raising isn’t just about creating more space, done right, it’s shaped by real tree biology, not guesswork. Whether you need to clear a sidewalk, improve a view, or prepare your property for landscaping, the right approach (correct cut placement, the right season, respecting the live crown ratio) keeps the tree strong and thriving for years.
Don’t risk uneven cuts, structural damage, or unnecessary stress on your trees from a rushed crown raise. Our certified arborists combine ISA-standard technique with the right tools to raise crowns safely and efficiently, tailored to your property’s needs.