

I’ve been removing deadwood from Ottawa trees since 2017, and it’s still one of the most underrated jobs in tree care. Deadwooding is the technique that removes dead or dying branches from a tree’s canopy, the ones that pose a real risk to property, people, and the tree itself, long before they’d ever fall on their own. In this guide, I’ll walk through what deadwooding actually is, why deadwood removal matter, in short, how to maintain tree health by pruning dead branches, and how I do it correctly using the right tools, timing, and technique.
What Is Deadwooding?
Deadwooding is a tree pruning technique that cuts away dead, diseased, or dying branches from a tree. These limbs often result from natural aging, weather damage, disease, or lack of sunlight. Over time, they become brittle and prone to snapping off, especially during storms or high winds.
While trees can technically shed dead limbs on their own, the process is slow and unpredictable. By proactively removing deadwood, you’re improving both the tree’s health and the safety of the area around it.

How Deadwooding Differs From Other Pruning
Unlike crown thinning or structural pruning, which shape or redistribute a tree’s weight, deadwooding targets only the parts that are already lifeless, there’s no judgment call about which living branch to remove for balance or light.
It’s less about design and more about protection, and I often combine it with other techniques like espalier pruning during the same visit, since clearing the dead wood first makes it much easier to see the tree’s actual living structure underneath. But the goal itself never changes: take out what’s already dead, and leave everything else exactly as it is.
The Dangers of Leaving Deadwood Untouched
Leaving dead branches on a tree doesn’t just affect its appearance, it’s a real, compounding risk. Here’s what I actually see happen when deadwood goes ignored:
Is Deadwooding Necessary for All Tree Species?
Deadwooding is a valuable maintenance technique, but it’s not equally necessary for every tree species. Some trees naturally shed dead limbs, while others retain them, increasing the risk of disease or falling hazards.
Tree Species That Benefit the Most from Deadwooding
These trees are prone to retaining dead branches or are commonly located in high-traffic areas where safety is a concern:
- Oak (Quercus spp.): Often holds onto deadwood; removal improves longevity and safety.
- Maple (Acer spp.): Dead branches can attract pests and disease if left in place.
- Ash (Fraxinus spp.): In my experience, this is the species I deadwood most in Ottawa right now. Emerald ash borer was confirmed here in 2008, and with ash making up roughly a quarter of the region’s tree canopy, infested trees can lose half their branches within a year and die within two to three, deadwooding is often the first sign something’s wrong, and it’s part of why CFIA continues to track the spread closely.
- Elm (Ulmus spp.): Prone to Dutch Elm disease; deadwooding helps monitor and reduce spread.
- Pine (Pinus spp.): Accumulates dead branches lower on the trunk; removal improves airflow and reduces fire risk.
Trees That Should Be Deadwooded Selectively
These species don’t always require regular deadwooding unless there’s a clear hazard or disease:
- Birch (Betula spp.): Naturally sheds small dead limbs; minimal intervention needed.
- Willow (Salix spp.): Flexible and fast-growing; often self-prunes but still needs periodic inspection.
- Dogwood (Cornus spp.): Usually doesn’t retain dead limbs long enough to become a problem.
Trees That Typically Don’t Require Deadwooding
These species are naturally resistant or self-managing:
- Palm Trees: Fronds die and fall off on their own; pruning is often aesthetic, not functional.
- Some ornamental flowering trees (like Japanese cherry) – Usually maintained for shape and blooms, not heavy deadwood management.
In short, deadwooding is most critical for mature, large, or potentially hazardous trees—especially those near structures or paths. For others, it can be done as needed rather than routinely. Always assess species, health, and location before deciding.
How to Deadwood a Tree
Deadwooding is simple in theory, but doing it properly means understanding the timing, using the right tools, and following safe procedures. This section walks you through the entire process, starting with when to do it, what tools you’ll need, and how to make proper cuts that protect your tree.
Decide When to Deadwood Your Tree
A few visual and seasonal cues can help you choose the best time to prune. Use this list to identify when it’s time to act:
| Symptom | What It Means |
|---|---|
| Bare limbs with no leaves in growing season | Branch is likely dead |
| Bark is cracked, peeling, or falling off | Wood is decaying |
| Brittle branches snap easily | Lack of moisture = deadwood |
| Fungal growth or cavities on branch | Internal rot is present |
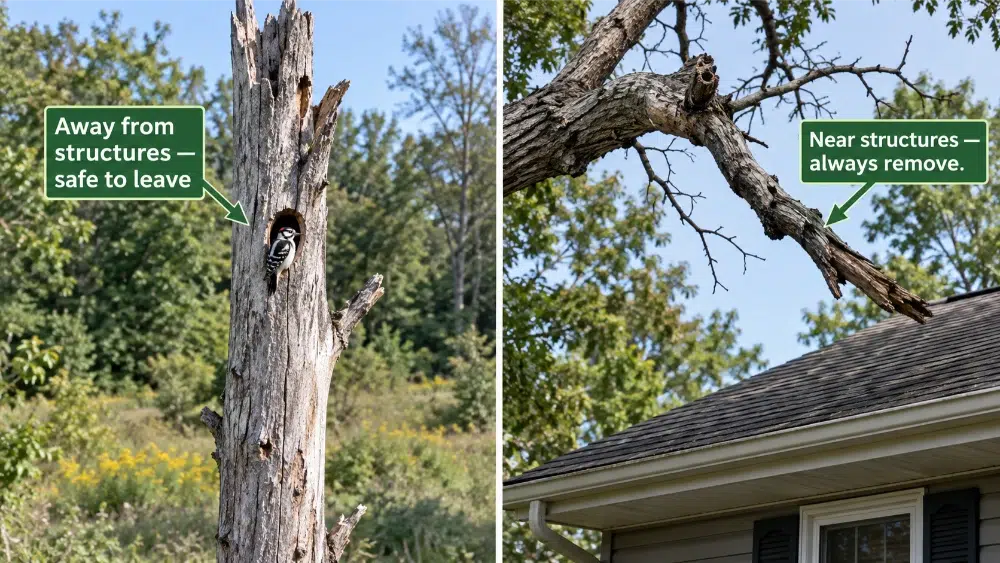
When Some Deadwood Is Worth Keeping
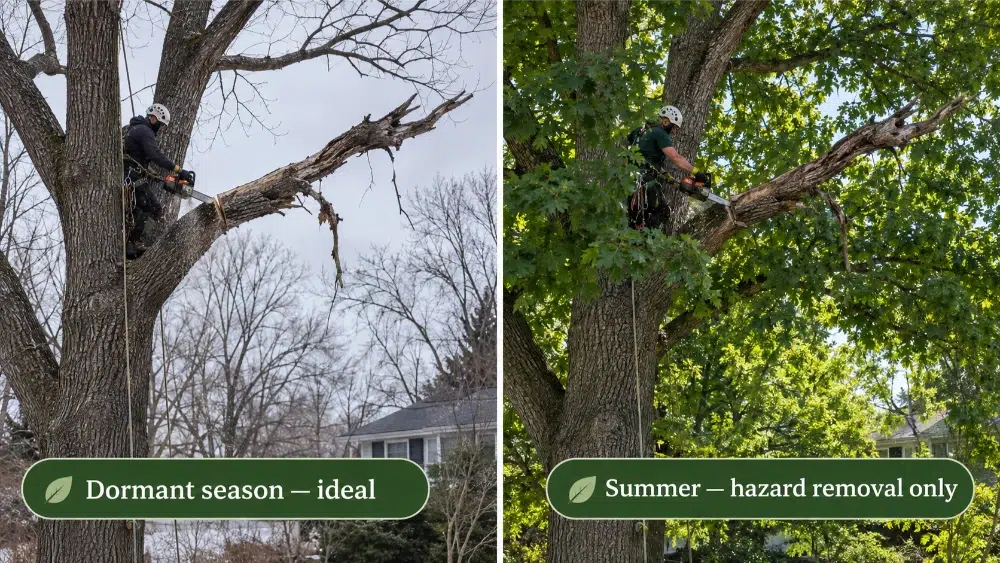
Best Times of Year for Deadwooding
Knowing how to remove deadwood before winter storms hit is one of the most valuable things I do for clients each fall, a dead limb that survives summer rarely survives a heavy snow load.
Tools and Safety Gear You’ll Need
Having the right tools and protective equipment is essential for safe, effective deadwooding. Here’s a practical list of the must-have gear that helps you work cleanly, efficiently, and without injury.
I clean my tools with rubbing alcohol before and after every tree, it’s a small habit that stops disease from spreading between jobs. I trained as a Certified Utility Arborist (CUA) through a 4-year apprenticeship with the Ontario College of Trades, and I follow ISA-certified standards on every deadwooding job, it’s exactly why I don’t cut corners on the steps below.
Don’t Risk It. Get Safe, Professional Deadwooding
Dead branches can fall without warning, causing damage or injury. Our expert team safely removes deadwood to protect your trees, and everything beneath them.
Step-by-Step Deadwooding Guide
Once you’ve identified the deadwood and gathered your tools, it’s time to start pruning. This step-by-step guide walks you through assessing, cutting, and maintaining your tree safely and correctly, whether you’re removing small limbs or larger, more hazardous ones.
Step 1: Assess and Mark Problem Branches
I start from the ground and inspect the tree visually, marking dead branches with flagging tape or chalk. If I’m unsure whether a branch is dead, I use the scratch test, scrape a small patch of bark. If it’s brown underneath instead of green, it’s dead.
Step 2: Make Clean, Strategic Cuts
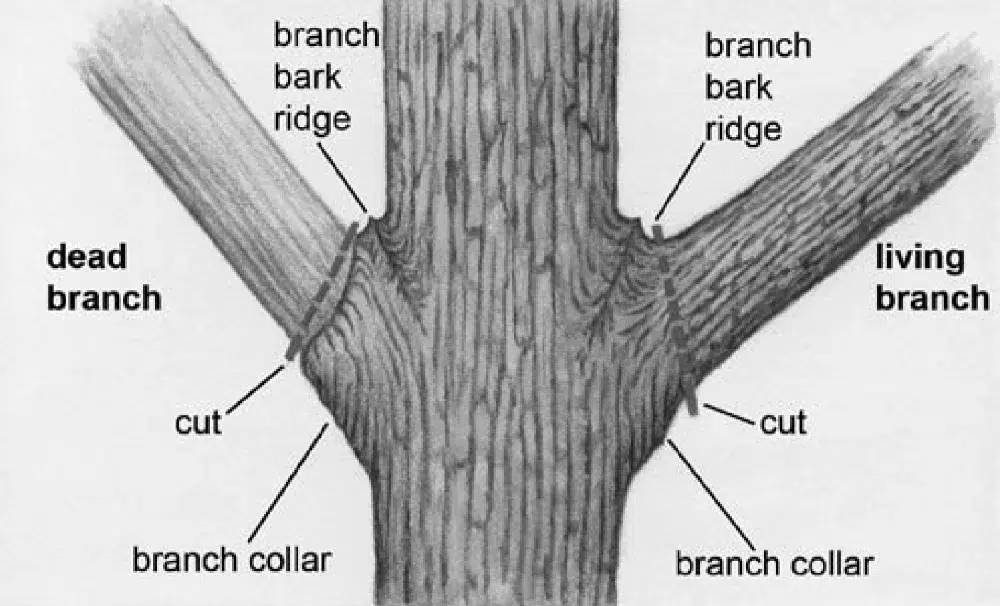
I always cut just beyond the branch collar, the slightly swollen area where the branch meets the trunk, and never flush against the trunk itself. This isn’t just habit: it’s based on real tree biology. Dr. Alex Shigo’s research on CODIT (Compartmentalization of Decay in Trees) showed that trees don’t heal wounds the way we do, they wall off damage internally instead, building up to four internal barriers, and the branch collar is where the strongest of those barriers forms.
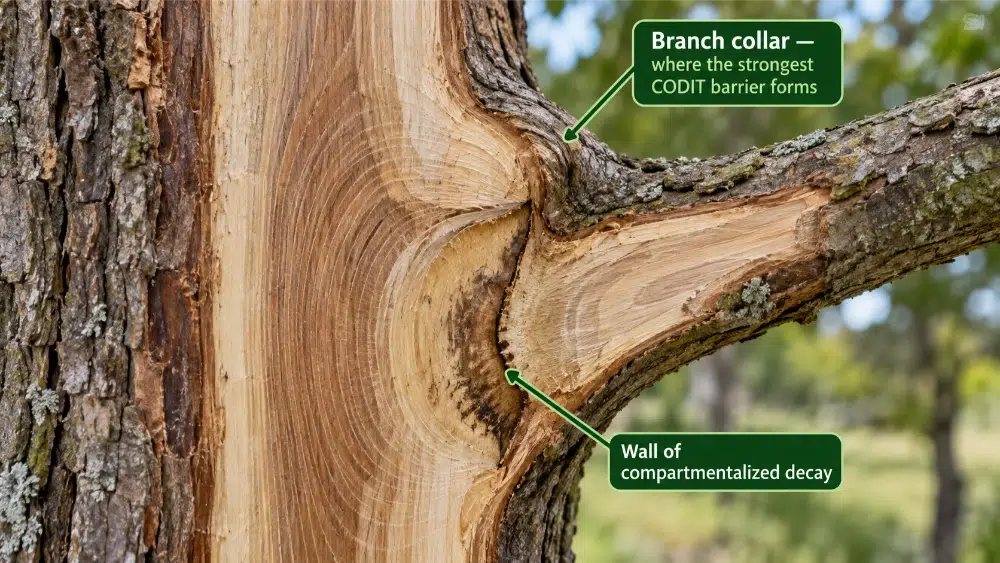
A flush cut removes exactly the tissue the tree needs to defend itself. One thing I never do afterward is seal the cut, pruning paste and wound sealants actually trap moisture against the wood and slow this natural walling-off process down, rather than helping it.
For a large or heavy branch, I use the three-cut method to prevent bark tearing:
- Undercut a few inches away from the trunk.
- Make a top cut slightly farther out to remove most of the limb.
- Finish with a clean cut just outside the collar.
Step 3: Dispose and Monitor
I remove all cut limbs from the site, deadwood can still harbour pests even after removal. (One local note: if it’s ash, disposal rules can be stricter given the ongoing EAB situation, so it’s worth checking before hauling it off your property.) Then I step back, reassess the tree’s shape, and note it for a recheck next year, deadwooding isn’t a one-time job, it’s ongoing maintenance.
Note: Unlike aggressive techniques such as tree pollarding, deadwooding is conservative and low-impact when done properly.
Mistakes to Avoid & When to Call a Professional
Deadwooding is a useful and straightforward pruning technique, but mistakes can lead to tree damage or personal injury. This section highlights common errors to avoid, essential safety tips, and clear guidelines on when it’s best to hire a certified arborist.
Common Deadwooding Mistakes
What should I know before cutting dead branches? Mostly that mistakes here can damage the tree or hurt the person doing the work just as easily as skill can prevent it.
Safety Tips for DIY Deadwooding
Knowing how to avoid injury from dead branches comes down to a handful of habits I never skip, no matter how small the job looks.
When to Call a Professional
Sometimes deadwooding isn’t a DIY job. Trees can be complex, hazardous, or valuable assets, and certain conditions demand expert care. This section helps you determine when to seek professional help.
Use This Decision Guide
| Question | If Yes | If No |
|---|---|---|
| Is the tree taller than 20 ft? | Hire a pro | Continue DIY |
| Are any branches over a roof, fence, or power line? | Hire a pro | Continue DIY |
| Do you need to climb to reach the branches? | Hire a pro | Continue DIY |
| Are you unsure if the branch is dead? | Consult a pro | Continue DIY |
| Is the tree valuable, historic, or large? | Hire a pro | Continue DIY with care |
Deadwooding is one piece of a much bigger picture, a tree that needs regular deadwooding often needs a broader look at its overall structure and health too. My team offers full tree pruning services in Ottawa that go beyond just removing dead limbs, covering structural pruning, crown health, and everything in between, so you’re not calling someone new every time a different issue comes up.
FAQ: DIY Tree Trimming
Still scratching your head? Here are quick answers to some of the most common questions people have about deadwooding.
In Short,
Deadwooding is an essential tree pruning technique that supports tree health, safety, and aesthetics. By understanding how to identify dead branches, when and how to remove them, and when to seek professional help, you can keep your trees strong and your property safe. Incorporate deadwooding into your regular tree care routine to enjoy healthier, more resilient trees for years to come.
Don’t Risk It. Get Safe, Professional Deadwooding
Dead branches can fall without warning, causing damage or injury. Our expert team safely removes deadwood to protect your trees, and everything beneath them.